MVC Application In Azure Common Vulnerability Resolution

While working with enterprise grade asp.net applications, maintaining security is a key goal. And today’s development world its not about confirming standards or practices, its also  needed to confirming compliance requirement and ultimately leads to a good key to selling product.

In this particular post I am about to point out few solution of the vulnerability test specific for mcafeesecure compliance, but if you take a close look its nothing to do with a specific vendor compliance, but must do  items for any asp.net web application.

ASP.NET DEBUG Method Enabled Security Issue Vulnerability

Threat

ASP.NET debugging is enabled on the host. An attacker can send debug statements to the remote ASP scripts.

Solution

Disable debugging. From web.config of the target web application  modify the debug attribute to false

<compilation debug=”false”/>

Web Server Internal IP Address/Internal Network Name Disclosure Vulnerability

Threat

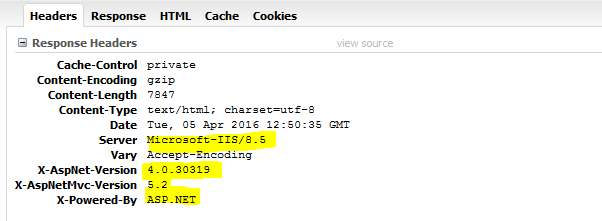
Asp.Net applications by default send information about the site with each response.CaptureA target host using HTTP may also be vulnerable to this issue.
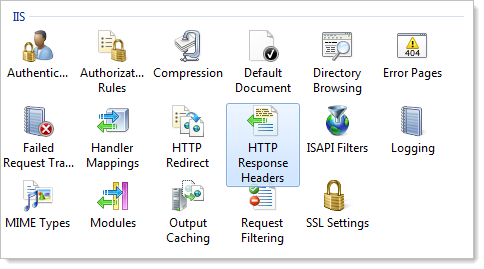
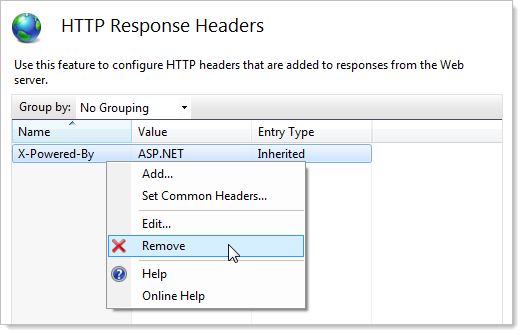
Solution

Capture

Capture1

In web.config

<system.web>
  <httpRuntime enableVersionHeader="false" />
</system.web>

In Global.ascx

MvcHandler.DisableMvcResponseHeader = true;

Remote Management Service Accepting Unencrypted Credentials Detected

Threat

A remote management service(Telnet, FTP) accepts unencrypted credentials.A malicious user/bot can easily intercept unencrypted passwords during transmission and gain unauthorized access.

Solution

Use alternate services that provide encryption. Most of the common case of using ftp service within IIS. Solution to this problem is using SFTP instead of FTP.

Tools To Check Vulnerability Issues

asafaweb Security Analyser

free online service to test configuration of any SSL web server

Asp.NET MVC Performance Tuning Guidelines

In today’s world, every application is expected to perform faster & smoother, its a part of overall user experience(UX). With the advancement of technology and the infrastructure it widely expected that application will not only do the job perfectly but also within a reasonable time. No one now wants to wait 5 mins to load a page, or complete a job while using a system. When we are in such phase of UX evolution performance tuning is common software development practice.

In a simple description performance tuning is to identify the issues that slow down the application and apply few tricks to improve performance.
In this particular post, I will only focus performance tuning at web application. To tune any web application there is 3 Steps.

  1. Insight
  2. Tune client end
  3. Tune server end

Insight

In order to make your move, you need to know first what is the problem with your application. Where you need to optimize, what are your priorities. To get these insights you need tools. Some tools will provide you the insights for client end, rest is for server end performance. Selecting right set of tool and using them is the first step of performance tuning.

Tune client end

Speed up the response time is crucial for UX and impacts the satisfaction of the user. Few tips/tricks can help you speed up your web application’s response time. Most of this time is tied up in downloading all the components in the page, minimize this time is the key to faster response.

Tune server end

Server side tuning mainly focus on low latency. How we can speedup the job that application is doing now at server end. This may involve database calls, file operations or make an external API call or may be few complex but poorly constructed business logic is the culprit. Newer Asp.Net framework s (4.5/5) is shipped (or to be shipped) with lots of performance improvement techniques or features, question is how efficiently we can utilize them.

Tools To Get Insight

Glimpse : For client end insight

Visual Studio Profiling : Visual Studio tool for performance diagnosis.

Client Side Tuning

  • Use cookies for frequently accessed non sensitive information
  • Use HTML5 async attribute for script files, to enable async loading

Scripts.RenderFormat(@"", "~/bundles/jquery")

  • Use a Content Delivery Network (CDN)
  • Minify JavaScript and CSS
  • Avoid CSS expressions
  • Remove duplicate scripts
  • Make Ajax calls cacheable
  • Choose <link> over @import
  • Optimize images
  • Don’t scale images in HTML
  • Don’t put empty image src
  • Make favicon.ico small and cache-able

Server Side Tuning

  • Run your site in Release mode, not Debug mode
  • Reducing the number of requests to the server by bundling
  • Use Base64 Data URIs
  • Avoid passing null models to views
  • Do not use Sessions or tempdata – which uses sessions
  • Add gzip (HTTP compression) and static cache (images, css, …) in your web.config

<system.webServer>

<urlCompression doDynamicCompression="true" doStaticCompression="true" dynamicCompressionBeforeCache="true"/>

</system.webServer>

  • Tells the webserver to set the “Expires” header to a far future date, effectively telling the browser to cache things forever.
<staticContent>
 <clientCache httpExpires="Sun, 29 Mar 2020 00:00:00 GMT" cacheControlMode="UseExpires" />
</staticContent>
  • If you use Razor, add the following code in your global.asax.cs, by default, Asp.Net MVC renders with an aspx engine and a razor engine. This only uses the RazorViewEngine.

ViewEngines.Engines.Clear();

ViewEngines.Engines.Add(new RazorViewEngine());

  • Replace foreach/for loop with linq wherever possible.
  • Avoid multiple database calls to load related data that serves one request. Say you are to make 2 separate db calls to get chunk of users and total number of users for a request that do paging, marge those two request as one.
  • Use in-memory cache for non cloud application and distributed cache for cloud one’s.

Optimizing or improving performance is a continuous effort. Monitor the application regularly, think about user behavior/interaction and the responses to gain max result. And as a note….load testing is excellent way to find out your application behavior before clients find those.

Good Read

Gears that will save your time to build a great web application

Template Start-up Kit

http://sidewaffle.com/

Automapper

https://github.com/AutoMapper/AutoMapper

POP3/IMAP Library

http://quia.cf/orange/pooxy4/nph-poxy.pl/es/20/https/github.com/bertjohnson/OpaqueMail

AddToCalendar – free widget button for event page

http://addtocalendar.com/

Free online tool to unminify

http://unminify.com/

Free online tool for development

http://quirktools.com/

Free online tool for RWD Test

http://responsivetest.net/

Analyze IIS logs using LogParser

https://gallery.technet.microsoft.com/Log-Parser-Studio-cd458765

Embrace reflection and export any List collection to excel

Introduction

Export to MS excel is a common feature for data driven business apps. And its very common that a individual app contains several such export feature that take different data respect to different needs and export to excel. Purpose this blog post is to provide a generic solution using .net Reflation and Generics so same export function can be reusable though entire application disrespect to object type and save our engineers effort.

Problem Statement

Engineers spend several hours to write redundant function contains such export features satisfy different needs. with a little twist codes can be reused.  But question is why is we implement different function for same purpose  answer is simple each object has different property so excel will contains different column name for each object. So programmers write different export functions that address a specific object type and hard coded the  excel column name .

How Reflection can Help

To address this issue we can use .net Generics and Reflection.  Lets not stretch the post by introducing them, you will find lots of good post about them, if you just google.  Our interest is on a particular feature reflection can do, you will see PropertyInfo.

Use PropertyInfo to discover information such as the name, data type, declaring type, reflected type, and read-only or writable status of a property, and to get or set property values.

So idea is we will use a Generic collection to export and use Reflection to iterate all property via PropertyInfo, thus we can get all property name/type all that whatever the object collection is provided. Once we have property name/ type we can do whatever data formatting  or processing we need according to our needs. Say for a particular app specification is whatever date time is exports to excel it should contains only time expressed in terms if millisecondsAs we have property type now , we can do that easily right? 🙂

Solution

Here is the method that take Generic List<t> as parameter and use reflection to iterate the type and export accordingly.

/// <summary>
 /// Take object List as input and export 
  ///to xls which will be prompt save as dialog
 /// </summary>
 /// <typeparam name="T">Type of object</typeparam>
 /// <param name="listToExport">Object list to export</param>
 /// <param name="xlsName">Excel file name to export</param>
 public static void ExportListToExcel<T>(List<T> listToExport, string xlsName)
 {
HttpContext.Current.Response.Clear();
 HttpContext.Current.Response.ClearContent();
 HttpContext.Current.Response.ClearHeaders();
 HttpContext.Current.Response.AppendHeader("Content-Type", "application/vnd.ms-excel");
 HttpContext.Current.Response.AppendHeader("Content-disposition", "attachment; filename=" + xlsName + ".xls");
Int32 success = 0;
 string sep = "";
 try
 {
 PropertyInfo[] fieldInfo = listToExport[0].GetType().GetProperties();
 foreach (PropertyInfo col in fieldInfo)
 {
 if (col.PropertyType != typeof(EntityKey) 
&& col.PropertyType != typeof(EntityState))
 {
 HttpContext.Current.Response.Write(sep + col.Name);
 sep = "\t";
 }
 }
 HttpContext.Current.Response.Write("\n");
foreach (T dataItem in listToExport)
 {
 PropertyInfo[] allProperties = dataItem.GetType().GetProperties();
 sep = "";
 foreach (PropertyInfo thisProperty in allProperties)
 {
 if (thisProperty.PropertyType != typeof(EntityKey) 
&& thisProperty.PropertyType != typeof(EntityKey))
 {
 object value = thisProperty.GetValue(dataItem, null);
 String propetyValue = (value == null ? String.Empty : value.ToString());
 HttpContext.Current.Response.Write(sep + propetyValue.ToString());
 sep = "\t";
 }
 }
 ++success;
 HttpContext.Current.Response.Write("\n");
 }
 HttpContext.Current.Response.End();
 }
 catch (Exception ex)
 {
 throw ex;
 }
 }

One thing might you notice above

if (thisProperty.PropertyType != typeof(EntityKey) && thisProperty.PropertyType != typeof(EntityKey))

Why we need this checking? you see if you are using Entity Framework in your app, all entity has these two additional property type predefined and we don’t what them to be exported to csv and confuse end user, do we? So additional checking is required to remove them. If you do not use Entity Framework you don’t need to worry about this checking.
So you can see a simple trick can save lots of development effort, enjoy the free time 🙂

Embrace reflection and export collection to csv

Introduction

Its became very common request in recent data driven apps to able to export some certain data as csv format. CSv format became widely used and acceptable. And its very common that a individual app contains several such export feature that take different object collection respect to different needs and export to csv, so here is the problem lies. Goal of this post is to provide a generic solution using .net Reflation and Generics so same export can be reusable though entire application disrespect to object type and save our (programmers: most hardworking creature in this planet after ant 😎 ) effort.

Problem Statement

I have seen programmers invest several hours to build such export features satisfy different needs. So what happens for different object collection programmers write different export method that address particular export feature. Why is that? answer is simple each object has different property so csv will contains different column name for each object. So programmers write different export functions that address a specific object type and arrange the csv column name statically.

How Reflection can Help

To address this issue we can use .net Generics and Reflection. I will not discuss about theses wonderful feature instead of that I will utilize those feature to find a solution. If you navigate to msdn to see what reflection can do, you will see PropertyInfo (Humm this is all we need) .

Use PropertyInfo to discover information such as the name, data type, declaring type, reflected type, and read-only or writable status of a property, and to get or set property values.

So idea is we will use a Generic collection to export and use Reflection to iterate all property via PropertyInfo, thus we can get all property name/type all that whatever the object collection is provided. Once we have property name/ type we can do whatever data formatting  or processing we need according to our needs. Say for a particular app specification is whatever date time is exports to csv it should be formatted like ddMMYYY. As we have property type now , its a piece of cake right? 🙂

Solution

Here is the method that take Generic List<t> as parameter and use reflection to iterate the type and export accordingly.

/// <summary>
 /// Take object List as input and export to csv 
///which will be prompt save as dialog
 /// </summary>
 /// <typeparam name="T">Type of object</typeparam>
 /// <param name="listToExport">Object list to export</param>
 /// <param name="seperateChar">character to use as scv separator</param>
 public static void ExportListToCSV<T>(List<T> listToExport, string seperateChar)
 {
 Int32 success = 0;
 StringBuilder export = new StringBuilder();
 try
 { 
 string seperator = "";
 StringBuilder builder = new StringBuilder();
 PropertyInfo[] fieldInfo = listToExport[0].GetType().GetProperties();
 foreach (PropertyInfo col in fieldInfo)
 {
  if (col.PropertyType != typeof(EntityKey) 
&& col.PropertyType != typeof(EntityState))
 {
 builder.Append(seperator).Append(col.Name);
 seperator = seperateChar;
 }
 }
 export.AppendLine(builder.ToString());
 foreach (T dataItem in listToExport)
 {
 PropertyInfo[] allProperties = dataItem.GetType().GetProperties();
 seperator = "";
 StringBuilder builderTmp = new StringBuilder();
 foreach (PropertyInfo thisProperty in allProperties)
 {
 if (thisProperty.PropertyType != typeof(EntityKey) 
&& thisProperty.PropertyType != typeof(EntityKey))
 {
 object value = thisProperty.GetValue(dataItem, null);
 String propetyValue = (value == null ? String.Empty : value.ToString());
 builderTmp.Append(seperator).Append(propetyValue);
 seperator = seperateChar;
 }
 }
 ++success;
 export.AppendLine(builderTmp.ToString()); 
 }
 }
 catch (Exception ex)
 {
 throw ex;
 }
// finally { if (sr != null) { sr.Close(); } }
HttpContext.Current.Response.Clear();
 HttpContext.Current.Response.Buffer = true;
 HttpContext.Current.Response.ContentType = "application/CSV";
 HttpContext.Current.Response.AppendHeader("content-disposition", 
                                "attachment;filename=FileName.csv");
 HttpContext.Current.Response.Charset = "";
 HttpContext.Current.Response.Cache.SetCacheability(HttpCacheability.NoCache);
 HttpContext.Current.Response.Write(export.ToString());
 HttpContext.Current.Response.End();
}

One thing might you notice above

if (thisProperty.PropertyType != typeof(EntityKey) 
&& thisProperty.PropertyType != typeof(EntityKey))

Why we need this checking? you see if you are using Entity Framework in your app, all entity has these two additional property type predefined and we don’t what them to be exported to csv and confuse end user, do we? So additional checking is required to remove them. If you do not use Entity Framework you don’t need to worry about this checking.

So you can see a simple trick can save lots of development effort, enjoy the free time 🙂

Mark a class or method as deprecated in c#

Background

The attribute Obsolete is used to mark types and members of types that should no longer be used. the Obsolete attribute is found in the System namespace; which means you can specify the type as Obsolete or ObsoleteAttribute—the suffix “Attribute” is automatically added at compile-time. A class or function can be made deprecated in c# by using obsolete attribute.For class/function use this attribute at top of the class/function. You can call attribute constructor by two ways,

[System.Obsolete("WARNING_MESSAGE")]
[System.Obsolete("WARNING_MESSAGE",[show compiler error true|false])]

Below is the example that shows usage of both constructor,

[Obsolete("Method1 is deprecated, please use Method2 instead.")]
public string Method1()
{
//function body
}

Upon calling this function compiler wont produces warning or error.

[System.Obsolete("Class1 is deprecated, use class2"),true]
class Class1
{
public void Method() { //function body  }
}

Upon calling instantiating this class, compiler wont produces warning or error.

API quick links used for development

Playing with API is always been my passion. I love the idea to bond with other app and share the data with my app. Throughout my career I used several API to  various type of business applications. Some are very good with their simple interface , others are good at documentation, some got good community.  Through this post I tried to point the quick links where developers can start with different API’s. Also from my point of view I put a ranking in terms of  API integration usability, developer resource, community resource and sample code.

Payment Gateway’s

Authorize.net
(Usability: 8/10, Dev resource: 9/10, Community: 9/10, Sample code: 10/10)

Developer resources

http://developer.authorize.net/

Sample codes

http://developer.authorize.net/downloads/

Community resources

http://community.developer.authorize.net/t5/Integration-and-Testing/bd-p/Integration01

Paypal
(Usability: 6/10, Dev resource: 7/10, Community: 2/10, Sample code: 4/10)

Developer resources:

https://cms.paypal.com/us/cgi-bin/?cmd=_render-content&content_ID=developer/library_documentation

Sample Codes: https://cms.paypal.com/us/cgi-bin/?cmd=_render-content&content_ID=developer/library_code

Community resources:  https://cms.paypal.com/us/cgi-bin/?cmd=_render-content&content_ID=developer/community_overview

CyberSource
(Usability: 6/10, Dev resource: 7/10, Community: 2/10, Sample code: 4/10)

CyberSource Simple Order API and SOAP Toolkit API Documentation:

http://www.cybersource.com/support_center/implementation/downloads/soap_api/SOAP_toolkits.pdf

Below resource covers processing credit card orders with CyberSource’s Simple Order API with the details of reason code

http://www.johnnybhome.com/forsale/SB_API.pdf

Social API’s

Facebook
(Usability: 9/10, Dev resource: 10/10, Community: 7/10, Sample code: 10/10)

Developer resources : http://developers.facebook.com/

JavaScript SDK with sample : http://developers.facebook.com/docs/reference/javascript/

Community resources: http://developers.facebook.com/blog/

Twitter
(Usability: 9/10, Dev resource: 10/10, Community: 7/10, Sample code: 10/10)

Developer resources: https://dev.twitter.com/docs

REST API and sample : https://dev.twitter.com/docs/api

Community resource : https://dev.twitter.com/discussions

Announcement: SocialShare Starter Kit (v1.0) is Released

SocialShare Starterkit v1.0 Relaesed. SocialShare Starter Kit is a kick start application that illustrate a wide range of features that needed to build a social site. And includes features like Status sharing,Blogs,Forums & more. Any one need a lightweight quick solution for his social portal,SocialShare Starter Kit is the savior.SocialShare Starter Kit uses T-4 templates to build logical layers (i.e. DAL/BLL) . The logical layers implemented here are based on Entity Framework 4.0. Its also a good example to learn T4 template and  how to utilize them work with asp.net data bound controls with minimum effort. I am continuously adding and fine tuning the existing feature list and performance. Checkout the app from codeplex SocialShare Starter Kit Home also documentation is available SocialShare Starter Kit documentation

whats the difference in Page class function ResolveURL vs ResolveClientURL

The .NET Page class contains two methods ResolveUrl and ResolveClientUrl  which are at first glance looks same.They both took same relative url and returns browser friendly URl. So why 2 function to do the same job?
Though their functionality is same but their way of returning client brower relative url makes the huge difference.ResolveClientUrl returns a path relative to the current page which user currently browsing, and ResolveUrl returns a path relative to the site root that is configured as root in IIS.

Lets Consider this structure
ROOT
–App_Themes
–Images
—-mypic.png
–MyAccount
—-default.aspx

Now from above example root of the IIS directory is ROOT, and all other directory is under this root. Now from MyAccount->default.aspx tries to access Images->mypic.png. ResolveUrl will do top to bottom parsing to find the resource, on other hand ResolveClientUrl will do bottom up parsing to find the same resource.
Function: Page.ResolveUrl(“~/Images/mypic.png”)

Returns: “/Images/mypic.png”

Function: Page.ResolveClientUrl(“~/Images/mypic.png”)

Returns: “../Images/mypic.png”

Difference betwwen this two is very visible if you hoste your web app under a shared hosting under a subdomain.For example you host your MY_SITE app under http://www.example.com subdomain,
and your physical file path is

example.com\www\MY_SITE under IIS directory.
So under this you placed your file structure given above. Now for any link if you set
Page.ResolveUrl(“~/MyAccount/default.aspx”),

watch out the URL in browser status bar you will see
http://www.example.comwww/MY_SITE/MyAccount/default.aspx ,

because ResolveUrl will parse from top root domain for this resource, so it took full path from root for that specific resource. On other hand ResolveClientUrl can solve this problem, this will parse from browsers present location to up towards the root so find the specific resource path.

Exploring WPF For Beginners – I

WPF is the most spreading technology these days. When I stepped into this amazing world I found many useful resources all over the web, but for beginner WPF learner like me it’s quite a task to pick the useful stuffs from those. So I go through several resources and try to combine my findings with others. So this post is for those guys who are new on WPF. From this post to next few posts I will explore WPF from basic to more deeper level, So lets begin….

What is WPF:

The Windows Presentation Foundation, WPF, provides a framework a new platform for building rich user experiences on Windows that blend application UI, documents, and media content. WPF offers developers 2D and 3D graphics support, hardware-accelerated effects, interactive data visualization, and superior content readability. WPF uses XAML(Extensible Application Markup Language) for rich user interface development.

A Common Technology for Windows and Web Browser

The primary goal of Windows Presentation Foundation (WPF) is to help developers create attractive and effective user interfaces. WPF unified platform helps make designers active participants in creating user interfaces, and provides a common programming model for standalone and browser applications, a unified platform for modern user interfaces, the ability for developers and designers to work together, and a common technology for Windows and Web browser user interfacesEnabling designers and developers work together like this reduces the translation errors that tend to occur when developers implement interfaces from designer-created images. It can also allow people in these two roles to work in parallel, with quicker iteration and better feedback.

WPF is the platform of choice for today’s visually demanding applications with its inherent support of rich media, data visualization, complex text content, dynamic interactive experiences, and branded or custom look and feel. For these types of applications, WPF provides significant advancements in areas such as advanced layout, control skinning and styling, animated hardware accelerated 2D and 3D graphics, and built in support for rendering of rich documents.

The table shows that prior to WPF building such a rich experience application could require five or more disparate sets of technologies :

WinForms PDF WinForms + GDI Windows Media Player Direct3D WPF
Forms, Controls X X X
Complex text X X
Images X X
Video / Audio X X
2D Graphics X   X
3D Graphics X X

A developer can create a XAML Browser Application (XBAP) using WPF that runs in Internet Explorer. In fact, the same code can be used to create a standalone WPF application and an XBAP.

WPF features

WPF shipped with many stunning features some of them I found interesting :

  • This aims to provide a unified avenue for displaying graphics, as well as more advanced graphical features.
  • Supports 3D model rendering and interaction in 2D applications.
  • Time-based animation. Scene redraws are time triggered
  • Presentation timers are initialized and managed by WPF
  • Animation effects can be defined on a per-object basis, which can be accessed directly from XAML markup
  • WPF has a built-in set of data services to enable application developers to bind and manipulate data within applications.
  • LINQ queries, specifically LINQ to XML, can also act as data sources for data binding
  • Binding of data has no bearing on its presentation. WPF provides data templates to control presentation of data.
  • A set of built-in controls is provided as part of WPF, containing items such as button, menu, grids and list box
  • WPF includes a number of typographic and text rendering features that were not available in GDI.
  • WPF handles texts in Unicode, and handles texts independent of global settings
  • The WPF text engine also supports built-in spell checking. It also supports such features as automatic line spacing, enhanced international text, language-guided line breaking, hyphenation, and justification, bitmap effects, transforms, and text effects such as shadows, blur, glow, rotation etc. Animated text is also supported; this refers to animated glyphs, as well as real-time changes in position, size, color, and opacity of the text.

WPF And XAML:

XAML is the heart of WPF. The benefits of XAML are not just in the presentation, data binding allows declarative connection to the underlying model. All of this makes it much easier to change your user interface without needing to change the other layers of your application. Another important aspect of XAML is the ability through these file formats to have designers and developers able to work on the same files.

WPF and VS2008

Since the platform is new, so is the tooling. Visual Studio 2008 has core WPF support with a new design surface that provides drag and drop support for WPF layout and controls, a new property editor, as well as Intellisense support for XAML editing. Also we can use Microsoft Expression Blend which focuses on the more creative, visual, and interactive aspects of the platform by manipulate animation, skinning and styling, data binding, and general visual asset creation. Expression Blend supports Visual Studio projects.

A Sample Application:

Lets enrich our skills by create a very simple application. I will try to be as much declarative as possible.

From File | New | Project click open the New Project window. Click on Visual C#  and expand its contents. Under .NET 3.5 Framework choose the Windows Application (WPF).

Choose  the name of the application to some name of your choice. For this article I have changed to WPF.Beginer.Part1. Click on the OK button after typing a name of your choice. This creates the necessary file/folders for the application.

There are two XAML files created in the project. The App.xaml and the Windows1.xaml file. App.xaml is more like default application startup point RUN.

Below is the Code of a sample beginner application that will contain a text box, a button and a label. Write something on text box then click button to fire an event handler and write that given text on level that it .pretty simple isn’t it?

Window1.xaml.cs Event Handler:
private void button1_Click(object sender, RoutedEventArgs e){

label2.Content = textBox1.Text;

}

Run the application thats it our very first WPF application. Have fun.

To be continued…….